Getting Started
Kano comes with small tutorials (a.k.a. tours) that can be directly run on the application in order to understand how its internal components can be used. You will first have to connect to make everything works as expected.
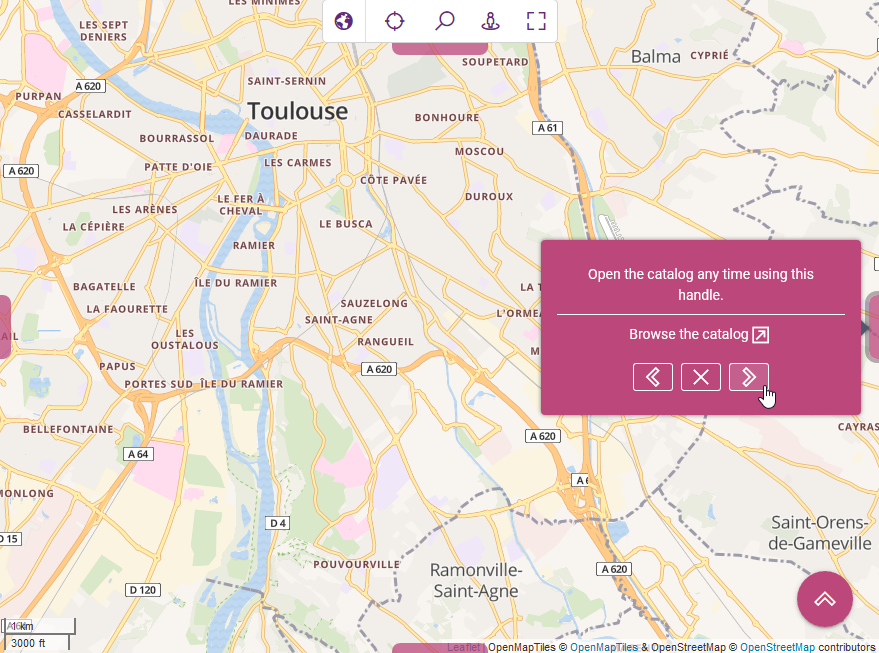
Then, you can launch the main tutorial directly from the main menu through the following icon . Follow the step by step guide , go back if required and stop anytime as illustrated by the following figure:
From the main tutorial you can open others tutorials dedicated to specific components (like e.g. the navigation bar) whenever you see the icon.
WARNING
Kano look and features are ever-evolving, moreover it can be configured according to your specific use case. As a consequence, your screen probably looks a little different than what you can read and see in this documentation but the key concepts remain the same.
Navigation
The following table details the way you can navigate the map in 2D or the globe in 3D:
| Mouse navigation | Touch navigation |
|---|---|
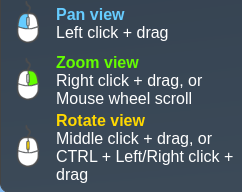 | 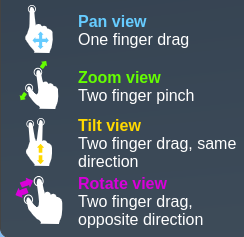 |
Note
Rotating or tilting the map is not possible in 2D.
Main menu
The main menu allows to open the documentation, manage your settings and logout from Kano.
👉 Launch the main tutorial from the main menu then open the link to the main menu tutorial to get more details
Application bar
The application bar allows to quickly execute recurring actions:
- switch from 2D (respectively 3D) activity to 3D (respectively 2D) activity,
- center the view on your current location and display it,
- seek for an address,
- manage your favorite views,
- tools to e.g. display the coordinates of a location,
- switch to fullscreen mode.
👉 Launch the main tutorial from the main menu then open the link to the navigation bar tutorial to get more details
Catalog
The catalog organises layers into different categories and comes with a set of built-in geospatial data (Catalog tab). However, you can complete it with your own spatial data (My data tab). The catalog allows to manage the layers displayed on your view. You can show/hide a layer by selecting it in the relevant category.
WARNING
The data of some layers are only visible starting from a given scale if there is too much data to ensure a readable and smvisualisation.
In this case the layer will be disable until you reach the required scale on the map (zoom in or zoom to the layer to do so).
Using the menu on a layer you can access available actions for this layer.
The catalog also displays your list of views (My views tab) and projects (My projects tab).
👉 Launch the main tutorial from the main menu then open the link to the catalog tutorial to get more details
Timeline
The timeline allows to quickly execute actions related to the time of the displayed data. Stick to real-time or go forward/backward in time as you wish.
👉 Launch the main tutorial from the main menu then open the link to the timeline tutorial to get more details
Floating action button
Using the FAB at the bottom right corner you can:
- Create a new view to recall a given extent while activating some data layers.
- Create a new blank data layer:
- By connecting to web mapping services using OGC standards (WMS, WFS, TMS, WMTS).
- By locating and drawing the underlying entities. You can add the data schema from a JSON schema file in order to edit the meatadata (i.e. properties) of your entities.
- By import existing data from a GeoJSON file.
- Create a new project for your users by selecting a set of layers and views.
- Probe weather forecast data from active prediction models by selecting a specific location on the map.
👉 Launch the main tutorial from the main menu then open the link to the FAB tutorial to get more details
Contextual menu
A right-click on a feature of the map will display a contextual menu if some actions are available for the target element like editing the properties of a user-defined feature or remove it.
Layer actions
Depending on the layer different actions are available. The most common action is to zoom to the layer in order to fit the view on the available data. If the layer is disabled at high scales this action will set the current scale of the map so that data will start be visible if the layer is shown.
More actions are available on user-defined feature layers:
- save the layer (i.e. make it persistent),
- edit layer properties like its name or description,
- edit layer features (metadata and geometry),
- edit display style,
- filter data according to metadata,
- display raw data,
- create charts,
- delete the layer.
When updating the properties of a layer you will be able to update the associated JSON Schema so that you can edit the metadata you want on each feature of your layer.
TIP
To avoid the burden of writing a schema by yourself Kano comes with an embedded tool to create a schema file from either an existing schema or a GeoJson file with a sample of your features (to induce the schema from). Note that you can export a feature sample from Kano, after importing your GeoJson file, once a feature has been selected with the Export object button.
The tool to create a schema is located at https://kano.your.domain.com/layer-json-schema-editor.html.
Projects
Users with permissions to manage the catalog (i.e. create, update, remove layers) can also create, update and remove projects. A project is a set of layers and views useful to cover a specific use case of your users.
When a user activates or opens a project by selecting it in the catalog, the current activity context will switch to only display layers and views available in the projects. A user can deactivate or close the current project using the icon in the application bar. He can also open another project using the dropdown project menu in the application bar.
Styling data
Create styles
Firstly, you need to create your styles, by accessing the style manager, from the application bar (top panel), under the tools menu. This new window allow you to create styles, by defining each property, for each type of feature (point, line, polygon).
Apply styles
Once you have created your different styles, you can apply them in different ways :
- Back to the style manager, the button let you choose to apply the style to a layer (if the button is not displayed, you may not have any layer on which you can use this action)
- Still in the style manager, the button allow you to apply the style to selected features (you can show selected features either by clicking on the top left corner of this window then Selection, or from the application bar (top panel), under the tools menu, by clicking Selection manager)
- By using filters. You can follow the steps described in the next section Filter data
Reset styles
To reset layer style, access to your layer actions on the right panel, and click on Reset style
To reset features style, access to the selection manager from the application bar (top panel), under the tools menu, by clicking Selection manager. You can then select the features you want to reset the style, and open the features actions menu by clicking the three dots icon and then Reset style
Filter data
Filters allow you to create sublayers than can be enabled/disabled independently of others, by grouping data that meets conditions.
You can access to the filter editing interface from the layer actions (layer should be saved, see Layer actions section), by clicking Filter data in the menu.
When creating a filter, you have the option to apply a style to the data. This style if linked, so any changes made to it in the style manager will automatically update the data's appearance