Installing Kano
Using Docker
WARNING
This requires you to install Docker, the world’s leading software container platform.
We provide Docker images on the Docker Hub to ease deploying your own instance. To run correctly it has to be linked with a standard MongoDB container for the database. Although it's possible to directly run Docker commands we provide you with docker-compose files to ease deployment, in addition to minimalist configuration files. These files will be detailed in the following sections and are available in the public folder of the documentation.
Once you have retrieved the required docker-compose and configuration files, jump into the folder with the docker-compose and configuration files, the following commands should do the job:
// Run the MongoDB and Kano containers
docker-compose up -d

// Stop the MongoDB and Kano containers
docker-compose down
// Stop the MongoDB and Kano containers erasing DB data
docker-compose down -v
Then point your browser to localhost:8080. You should see something like this once connected:
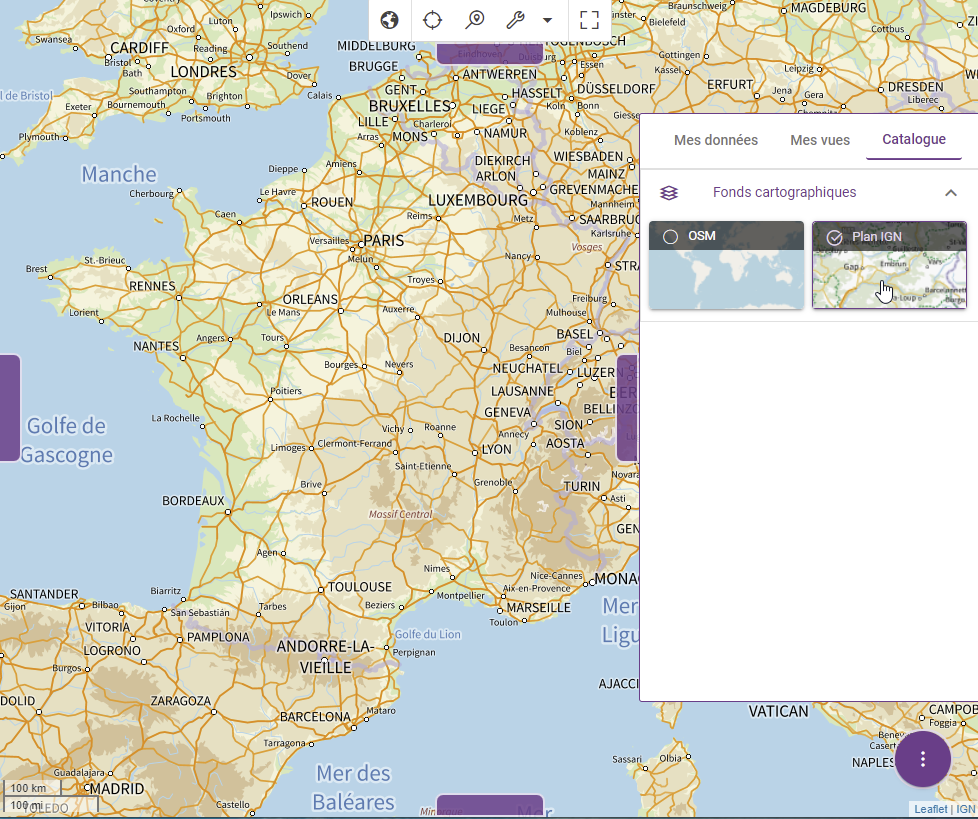
TIP
Check the local.cjs configuration file below to find the required login information
WARNING
If running Docker under Windows in a virtual machine first redirect the port 8080 of your virtual machine to your host
docker-compose.yml - Used to deploy MongoDB and Kano containers.
version: '3.3'

services:
  kano:
    image: kalisio/kano:dev
    environment:
      - APP_SECRET=xxx
      - LAYERS_FILTER=OSM PLAN_IGN CESIUM_ELLIPSOID
      - BUILD_NUMBER
      - NODE_APP_INSTANCE
      - DB_URL=mongodb://mongodb:27017/kano
      - DATA_DB_URL
      - CESIUM_TOKEN=xxx
      - MAPILLARY_TOKEN=xxx
    volumes:
      - type: bind
        source: ./my-layers.cjs
        target: /opt/kalisio/kano/api/config/layers/my-layers.cjs
      - type: bind
        source: ./local-kano.cjs
        target: /opt/kalisio/kano/api/config/local.cjs
    ports:
      - "8080:8081"
    networks:
      - kano
  mongodb:
    image: mongo:4.2
    volumes:
      - mongodb:/data/db
    ports:
      - "27017:27017"
    networks:
      - kano

volumes:
  mongodb:

networks:
  kano:
Kano comes with a default set of users but you should change this default configuration for a public deployment and avoid leaking login/passwords. Similarly, Kano comes with a default set of layers targeting geospatial services deployed by Kargo and you should add your own data layers instead. This is done by configuration using the following files:
local.cjs - Used to override the default backend configuration and setup a default user.
To be put in the kano/api/config directory.
module.exports = {
  authentication: {
    defaultUsers: [
      {
        email: process.env.DEFAULT_USER_EMAIL || 'john.doe@gmail.com',
        password: process.env.DEFAULT_USER_PASSWORD || 'John;Doe1',
        name: 'John Doe',
        catalog: { permissions: 'owner' }, // Grant admin rights to update catalog
        layers: [{ // Grant admin rights to update layer data
          name: 'Layers.SENSORS',
          permissions: 'manager',
          probeService: 'sensors-stations',
          service: 'sensors-observations'
        }]
      }
    ]
  }
}
my-layers.cjs - Used to define the available default layers.
To be put in the kano/api/config/layers directory. Example based on OpenStreeetMap tile servers and IGN web services.
module.exports = [{
    name: 'Layers.OSM',
    description: 'Layers.OSM_DESCRIPTION',
    i18n: {
      fr: {
        Layers: {
          OSM: 'OSM',
          OSM_DESCRIPTION: 'Données OpenStreetMap'
        }
      },
      en: {
        Layers: {
          OSM: 'OSM',
          OSM_DESCRIPTION: 'OpenStreeMap data'
        }
      }
    },
    tags: [
      'street'
    ],
    iconUrl: `http://a.tile.osm.org/0/0/0.png`,
    icon: 'streetview',
    attribution: 'OpenStreetMap © <a href="http://openstreetmap.org">OpenStreetMap</a> contributors',
    type: 'BaseLayer',
    leaflet: {
      type: 'tileLayer',
      isVisible: true,
      source: 'http://{s}.tile.osm.org/{z}/{x}/{y}.png',
      maxZoom: 21,
      maxNativeZoom: 18
    },
    cesium: {
      type: 'OpenStreetMap',
      url: `http://a.tile.osm.org`
    }
  },
  {
    name: 'Layers.PLAN_IGN',
    description: 'Layers.PLAN_IGN_DESCRIPTION',
    i18n: {
      fr: {
        Layers: {
          PLAN_IGN: 'Plan IGN',
          PLAN_IGN_DESCRIPTION: 'Plan IGN v2'
        }
      },
      en: {
        Layers: {
          PLAN_IGN: 'Plan IGN',
          PLAN_IGN_DESCRIPTION: 'Plan IGN v2'
        }
      }
    },
    tags: [
      'street'
    ],
    type: 'BaseLayer',
    iconUrl: 'https://data.geopf.fr/wmts?SERVICE=WMTS&REQUEST=GetTile&VERSION=1.0.0&LAYER=GEOGRAPHICALGRIDSYSTEMS.PLANIGNV2&STYLE=normal&FORMAT=image/png&TILEMATRIXSET=PM&TILEMATRIX=8&TILEROW=92&TILECOL=132',
    icon: 'las la-plug',
    attribution: '<a href="https://www.ign.fr/">IGN</a>',
    cesium: {
      type: 'WebMapTileService',
      url: 'https://data.geopf.fr/wmts?SERVICE=WMTS&REQUEST=GetTile&VERSION=1.0.0&LAYER=GEOGRAPHICALGRIDSYSTEMS.PLANIGNV2&STYLE=normal&FORMAT=image/png&TILEMATRIXSET=PM&TILEMATRIX={TileMatrix}&TILEROW={TileRow}&TILECOL={TileCol}',
      format: 'image/png',
      layer: 'GEOGRAPHICALGRIDSYSTEMS.PLANIGNV2',
      style: 'normal',
      tileMatrixSetID: 'PM'
    },
    leaflet: {
      type: 'tileLayer',
      source: 'https://data.geopf.fr/wmts?SERVICE=WMTS&REQUEST=GetTile&VERSION=1.0.0&LAYER=GEOGRAPHICALGRIDSYSTEMS.PLANIGNV2&STYLE=normal&FORMAT=image/png&TILEMATRIXSET=PM&TILEMATRIX={z}&TILEROW={y}&TILECOL={x}',
    }
  }
]
As detailed in the KDK documentation Kano comes into three different flavors. By default the docker-compose file targets the latest development version (dev tag) but you can change it to target either a beta (test tag) or a production (prod tag) release.
WARNING
By default no built-in layers are available in Kano unless you specify their names using the LAYERS_FILTER environment variable. By defining LAYERS_FILTER=* you will get all built-in layers but take care that a lot of them requires additional services to work correctly (read following sections below). You can however directly add new layers using the Kano GUI (through the add layer button or by drag'n'drop on the map).
TIP
If you'd like to use the 3D mode or the Mapillary layer you should provide the required tokens to access their respective APIs on the backend side by setting the following environment variables: CESIUM_TOKEN, MAPILLARY_TOKEN.
Add weather forecasts
Kano integrates smoothly with Weacast in order to display weather forecast data. You can also use Docker containers to run Weacast by following this guide and taking care of port conflicts as they use the same by default.
The following commands and additional docker-compose file should do the job:
// Run the MongoDB, Weacast and Kano containers
docker-compose -f docker-compose.yml -f docker-compose-weacast.yml up -d
// Stop the MongoDB, Weacast and Kano containers
docker-compose -f docker-compose.yml -f docker-compose-weacast.yml down
// Stop the MongoDB, Weacast and Kano containers erasing DB data
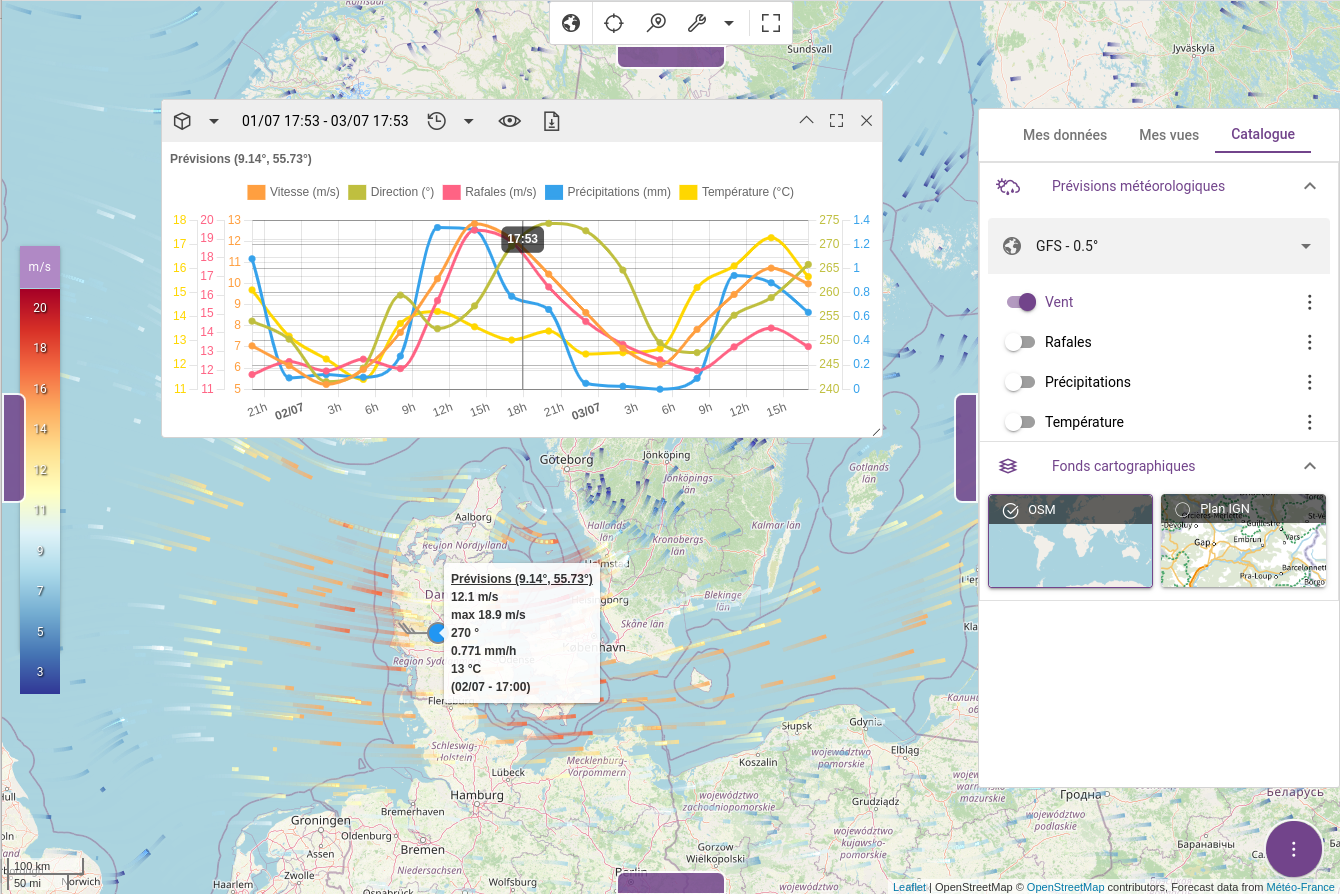
docker-compose -f docker-compose.yml -f docker-compose-weacast.yml down -vWait a couple of minutes so that Weacast feeds the database with the latest forecast then point your browser to localhost:8080. You should see something like this once connected if you display some meteorological layers and probe a location:
docker-compose-weacast.yml - Used to deploy Weacast container.
version: '3.3'

services:
  kano:
    environment:
      - LAYERS_FILTER=OSM PLAN_IGN WIND_TILED GUST_TILED PRECIPITATIONS_TILED TEMPERATURE_TILED CESIUM_ELLIPSOID
  weacast:
    image: weacast/weacast-api:dev
    environment:
      - APP_SECRET=yyy
      - DB_URL=mongodb://mongodb:27017/weacast
      - LOADERS=gfs
      - LOG_LEVEL
      - DEBUG
    ports:
      - "8081:8081"
    networks:
      - kano
TIP
You should activate the built-in Weacast layers like WIND_TILED in Kano using the LAYERS_FILTER environment variable.
Add krawler jobs
Kano integrates smoothly with Krawler jobs in order to feed data for near real-time measurements/observations layers. A lot of built-in layers requires the associated job(s) to be deployed beside Kano. You can search for available jobs in our GitHub organisation and find more information about available layers in the Kalisio Crisis catalog.
For the purpose of this documentation we will focus on the k-hubeau hydro jobs but others jobs work similarly. The following commands and additional docker-compose file should do the job:
// Run the MongoDB, Hubeau jobs and Kano containers
docker-compose -f docker-compose.yml -f docker-compose-hubeau.yml up -d
// Stop the MongoDB, Hubeau jobs and Kano containers
docker-compose -f docker-compose.yml -f docker-compose-hubeau.yml down
// Stop the MongoDB, Hubeau jobs and Kano containers erasing DB data
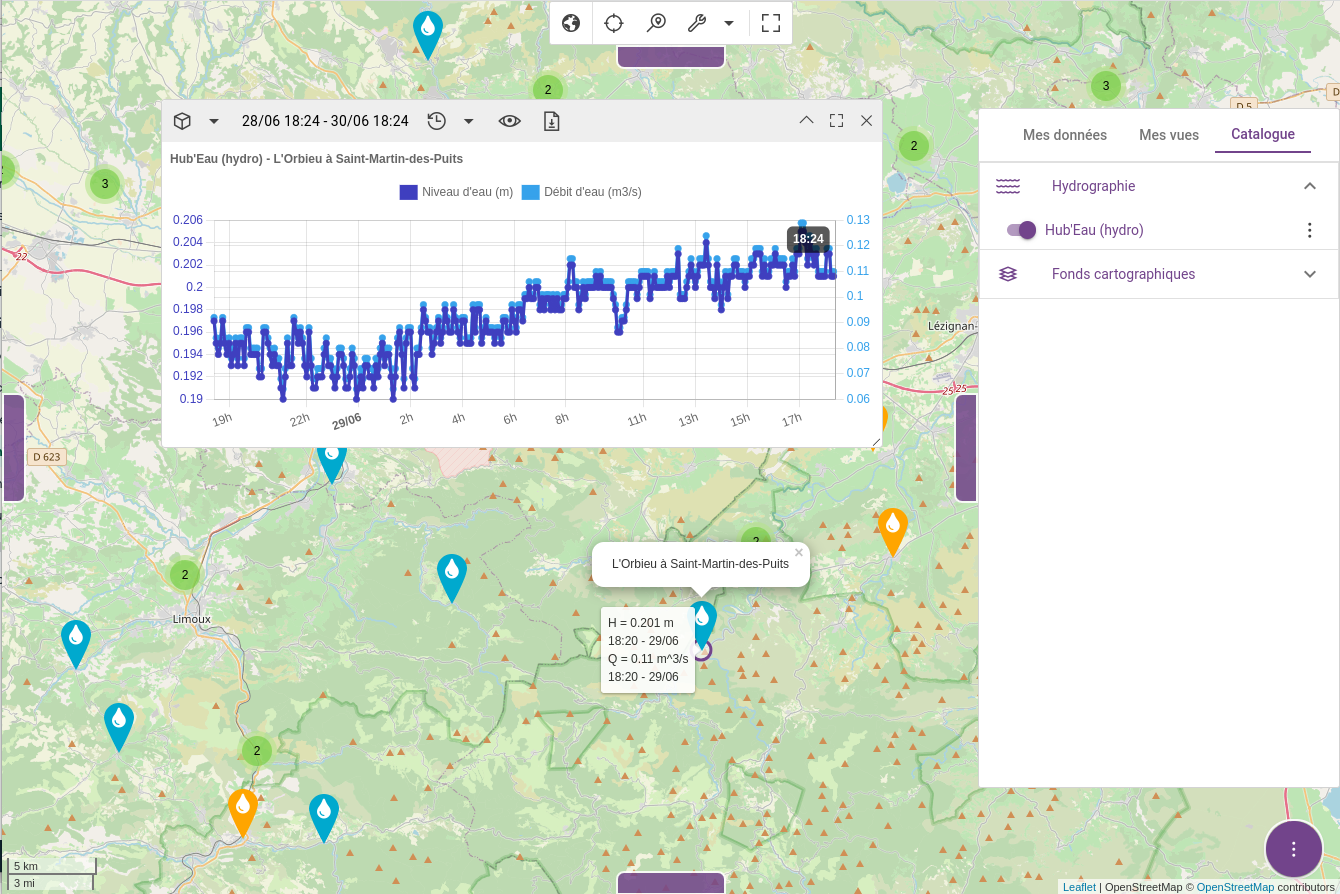
docker-compose -f docker-compose.yml -f docker-compose-hubeau.yml down -vWait a couple of minutes so that the jobs feeds the database with the latest observations then point your browser to localhost:8080. You should see something like this once connected if you display the observations layer, zoom in and pick a station:
docker-compose-hubeau.yml - Used to deploy Hubeau jobs containers.
version: '3.3'

services:
  kano:
    environment:
      - LAYERS_FILTER=OSM PLAN_IGN HUBEAU_HYDRO
  hubeau-stations:
    image: kalisio/k-hubeau:hydro-stations-latest
    environment:
      - DB_URL=mongodb://mongodb:27017/kano
      - DEBUG
    networks:
      - kano
  hubeau-observations:
    image: kalisio/k-hubeau:hydro-observations-latest
    environment:
      - DB_URL=mongodb://mongodb:27017/kano
      - DEBUG
    depends_on:
      hubeau-stations:
        condition: service_healthy
    networks:
      - kano
TIP
You should activate the built-in Hub'Eau layers like HUBEAU_HYDRO in Kano using the LAYERS_FILTER environment variable.
From source code
First you have to ensure the KDK prerequisites to run Kano from source code.
WARNING
At the time of writing Kano v2.x (master branch) is expected to work with KDK modules v2.x (master branch and Node.js 16.x) and Kano v1.x (test branches) is expected to work with KDK modules v1.x (Node.js 12.x)
Then the following commands, assuming you have a MongoDB instance running on local host and default port (27017), should launch your local instance of Kano:
// Clone KDK
git clone https://github.com/kalisio/kdk.git
cd kdk
yarn install
yarn link

// In another terminal clone Kano
git clone https://github.com/kalisio/kano.git

// Set the most minimalist environment to run server
export APP_SECRET="xxx"
export LAYERS_FILTER="OSM PLAN_IGN CESIUM_ELLIPSOID"

// Run the server/API
cd kano/api
// Copy custom configuration files
cp local.js config
cp my-layers.js config/layers
yarn install
yarn link @kalisio/kdk
yarn dev

// In another terminal run the client app
cd kano
yarn install
yarn link @kalisio/kdk
yarn dev
Point your browser to localhost:8080.
Add weather forecasts
Instead of using Docker containers you can directly install Weacast from the source code as well by following this guide. You should however take care of port conflicts as it uses the same than Kano by default (API and NodeJS debugger), the following commands should do the job:
// Clone Weacast
git clone https://github.com/weacast/weacast.git
cd weacast
yarn install

// Set the most minimalist environment to run server
export PORT="8082"
export NODE_OPTIONS="--inspect-port=9230"
export LOADERS="gfs"

// Run the server/API
cd packages/api
yarn dev
TIP
You should activate the built-in Weacast layers like WIND_TILED in Kano using the LAYERS_FILTER environment variable.
Add krawler jobs
Instead of using Docker containers you can directly install Krawler from the source code as well by following this guide and retrieve/run required jobs manually, it's notably useful when developing new jobs:
git clone https://github.com/kalisio/krawler
cd krawler
yarn install
yarn link
// Now you can proceed with your jobs
git clone https://github.com/kalisio/k-hubeau
yarn install
yarn link @kalisio/krawler
// Set the most minimalist environment to run the jobs
export DB_URL=mongodb://mongodb:27017/kano
// Now you can launch the jobs manually using the krawler CLI
krawler ./jobfile-hydro-stations.js
krawler ./jobfile-hydro-observations.js
Using Minikube
WARNING
This requires you to install Minikube, a popular implementation of local K8s cluster. The Kubernetes packet manager Helm is also required.
- This tutorial use a docker image from the Docker Hub. Kalisio also provides a helm char for Kano, hosted in the Kargo repository, a collection of charts written by Kalisio.
- Kano requires the Mongodb database. MongoDB will be installed with the famous charts collection from Bitnami.
The installation described here contains a minimalist set of configuration files to run Kano. These files will be detailed in the following sections and are available in the public folder of the documentation.
All the files needed from installation are available in public folder/minikube. All the resources will be created in a tutorial namespace of your Kubernetes cluster.
The Kano chart reads values like database Url connexion from Kubernetes secrets. So the first step is to create the secrets. After that we install the MongoDb and Kano chart. Run the following commands to perform the required actions:
kubectl create namespace tutorial
kubectl -n tutorial create secret generic kano \
    --from-literal=db-url='mongodb://kano:kano@mongodb/kano' \
    --from-literal=data-db-url='mongodb://kano:kano@mongodb/kano' \
    --from-literal=app-secret='MySecret!' \
    --from-literal=cesium-token='' \
    --from-literal=mapillary-token=''
helm -n tutorial install \
    --version 15.1.1 \
    --set useStatefulSet=true \
    --set 'auth.rootPassword=R33T!,auth.usernames={kano}' \
    --set 'auth.passwords={kano},auth.databases={kano}' \
    mongodb  oci://registry-1.docker.io/bitnamicharts/mongodb
kubectl create -n tutorial configmap kano-config \
    --from-file=local.cjs=./docs/.vitepress/public/local-kano.cjs \
    --from-file=my-layers.cjs=./docs/.vitepress/public/my-layers.cjs
helm -n tutorial install -f docs/.vitepress/public/kano.yaml kano  oci://harbor.portal.kalisio.com/kalisio/helm/kano
To access to Kano, we are asking Minikube to open a web brower on the Kano URL:
minikube -n tutorial service kanoYou should see something like this once connected:
TIP
Check the local.cjs configuration file below to find the required login information
WARNING
To simplify the tutorial we do not configure the ingress ressources of Minikube.
kano.yaml - Provided values to configure the Kano helm chart.
#############################################################################
# Kano chart values for the Kano tutoriel
# cf. https://kalisio.github.io/kano/guides/installing-kano.html
# minimum configuration to run Kano
#############################################################################

global:
  # subdomain to be used when computing the ingress host
  subdomain: ""
  # certIssuer to assign to the ingress cert-manager annotation
  certIssuer: ""
  # secret where to share sentitive environment variables
  secret: ""

# commonAnnotations are annotations to be added to all resources (sub-charts are not considered). Evaluated as a template
commonAnnotations: {}

# commoneLabels are labels to be added to all resources (sub-charts are not considered). Evaluated as a template
commonLabel: {}

# replicatCount is the number of replicas
replicaCount: 1


image:
  repository: kalisio/kano
  tag: "test"
  pullPolicy: IfNotPresent

# expose the service on a node port 8081
service:
  enabled: true
  type: NodePort
  port: 8081
  annotations: {}

ingress:
  enabled: false

distribution:
  # not external services as consumer for this tutorial
  enabled: false

env:
  # appId specifies the application id for the API gateway if used
  appId: "myId"
  # String to define the layers to be integrated into the catalog
  layersFilter: "*"
  # logLevel specifies the level of frontend log
  logLevel: ""
  # debug specified the list of backend modules for which the debug output is enabled
  debug: ""

# resources are resource requests and limits to be applied
resources: {}

# default security context, run as non root uid 1000
podSecurityContext:
  runAsNonRoot: true
  runAsUser: 1000

# override the configuration of Kano with config map
additionalConfig:
  configMap: 'kano-config'
  fileMapping:
    local.cjs: /opt/kalisio/kano/api/config/local.cjs
    my-layers.cjs: /opt/kalisio/kano/api/config/layers/my-layers.cjs
Kano comes with a default set of users but you should change this default configuration for a public deployment to avoid leaking login/passwords. Similarly, Kano comes with a default set of layers targeting geospatial services deployed by Kargo and you should add your own data layers instead. This is done by configuration using the following files:
local.cjs - Used to override the default backend configuration and setup a default user.
To be put in the kano/api/config directory.
module.exports = {
  authentication: {
    defaultUsers: [
      {
        email: process.env.DEFAULT_USER_EMAIL || 'john.doe@gmail.com',
        password: process.env.DEFAULT_USER_PASSWORD || 'John;Doe1',
        name: 'John Doe',
        catalog: { permissions: 'owner' }, // Grant admin rights to update catalog
        layers: [{ // Grant admin rights to update layer data
          name: 'Layers.SENSORS',
          permissions: 'manager',
          probeService: 'sensors-stations',
          service: 'sensors-observations'
        }]
      }
    ]
  }
}
my-layers.cjs - Used to define the available default layers.
To be put in the kano/api/config/layers directory. Example based on OpenStreeetMap tile servers and IGN web services.
module.exports = [{
    name: 'Layers.OSM',
    description: 'Layers.OSM_DESCRIPTION',
    i18n: {
      fr: {
        Layers: {
          OSM: 'OSM',
          OSM_DESCRIPTION: 'Données OpenStreetMap'
        }
      },
      en: {
        Layers: {
          OSM: 'OSM',
          OSM_DESCRIPTION: 'OpenStreeMap data'
        }
      }
    },
    tags: [
      'street'
    ],
    iconUrl: `http://a.tile.osm.org/0/0/0.png`,
    icon: 'streetview',
    attribution: 'OpenStreetMap © <a href="http://openstreetmap.org">OpenStreetMap</a> contributors',
    type: 'BaseLayer',
    leaflet: {
      type: 'tileLayer',
      isVisible: true,
      source: 'http://{s}.tile.osm.org/{z}/{x}/{y}.png',
      maxZoom: 21,
      maxNativeZoom: 18
    },
    cesium: {
      type: 'OpenStreetMap',
      url: `http://a.tile.osm.org`
    }
  },
  {
    name: 'Layers.PLAN_IGN',
    description: 'Layers.PLAN_IGN_DESCRIPTION',
    i18n: {
      fr: {
        Layers: {
          PLAN_IGN: 'Plan IGN',
          PLAN_IGN_DESCRIPTION: 'Plan IGN v2'
        }
      },
      en: {
        Layers: {
          PLAN_IGN: 'Plan IGN',
          PLAN_IGN_DESCRIPTION: 'Plan IGN v2'
        }
      }
    },
    tags: [
      'street'
    ],
    type: 'BaseLayer',
    iconUrl: 'https://data.geopf.fr/wmts?SERVICE=WMTS&REQUEST=GetTile&VERSION=1.0.0&LAYER=GEOGRAPHICALGRIDSYSTEMS.PLANIGNV2&STYLE=normal&FORMAT=image/png&TILEMATRIXSET=PM&TILEMATRIX=8&TILEROW=92&TILECOL=132',
    icon: 'las la-plug',
    attribution: '<a href="https://www.ign.fr/">IGN</a>',
    cesium: {
      type: 'WebMapTileService',
      url: 'https://data.geopf.fr/wmts?SERVICE=WMTS&REQUEST=GetTile&VERSION=1.0.0&LAYER=GEOGRAPHICALGRIDSYSTEMS.PLANIGNV2&STYLE=normal&FORMAT=image/png&TILEMATRIXSET=PM&TILEMATRIX={TileMatrix}&TILEROW={TileRow}&TILECOL={TileCol}',
      format: 'image/png',
      layer: 'GEOGRAPHICALGRIDSYSTEMS.PLANIGNV2',
      style: 'normal',
      tileMatrixSetID: 'PM'
    },
    leaflet: {
      type: 'tileLayer',
      source: 'https://data.geopf.fr/wmts?SERVICE=WMTS&REQUEST=GetTile&VERSION=1.0.0&LAYER=GEOGRAPHICALGRIDSYSTEMS.PLANIGNV2&STYLE=normal&FORMAT=image/png&TILEMATRIXSET=PM&TILEMATRIX={z}&TILEROW={y}&TILECOL={x}',
    }
  }
]
As detailed in the KDK documentation Kano comes into three different flavors. By default the helm chart targets the latest preproduction version (test tag) but you can change it to target either a development (dev tag) or a production (prod tag) release using the command line switch --set image.tag=prod.
WARNING
By default no built-in layers are available in Kano unless you specify their names using the LAYERS_FILTER environment variable. By defining LAYERS_FILTER=* you will get all built-in layers but take care that a lot of them requires additional services to work correctly (read following sections below). You can however directly add new layers using the Kano GUI (through the add layer button or by drag'n'drop on the map).
TIP
If you'd like to use the 3D mode or the Mapillary layer you should provide the required tokens to access their respective APIs on the backend side by setting the following environment variables: CESIUM_TOKEN, MAPILLARY_TOKEN.
To uninstall the Kano environment:
kubectl delete all --all -n tutorial
kubectl delete namespace tutorial
WARNING
Please note that it will not delete the associate PVC. If you want to remove it, use kubectl delete pvc <the_PVC_of_mongoDB_in_tutorial>.